Join East Shore children and youth for our annual Winter Holidays Pageant, this time, virtual! We’re pleased to present to you all a fun-filled morning reflecting on the various wisdom traditions who celebrate year after year since time immemorial during the dark of the year. We’re even including a song from the choir!
Sign up for a role from the listed on the Signup Genius form, or find your name here to double check your role if you’ve already started your work!
Most roles must prerecord the material (audio and/or video) ahead of time, due by December 9th, and can be uploaded to a shared file system or sent via email. Instructions are in the packet.
Most roles will contribute to the December 20th Sunday Worship Service, the Annual Winter Pageant. Some parts will be used for Christmas Eve services, as marked on the Sign up Genius.
Upload your video or audio submissions into this Google Drive Folder. Click on the image above, and drag and drop. It’s that easy!
UPDATE: The postcards are in and ready to be picked up! Please stop by the church after Thursday, December 3 to pick up a pack or two… or three! Or, you can email Nicole and have her mail you some.
The cards will be in the Sanctuary Foyer and available for pick up Monday-Wednesday, 11:00 a.m. – 3:00 p.m. or with coordination with staff (email Dianne).
—————————————————
One of my favorite traditions I have brought to East Shore is the signing and sending of holiday cards. I love reaching out to our homebound members and those who are currently unable to attend East Shore services in person. Of course this year, that’s EVERYONE!
To help spread some holiday cheer, I will be having postcards made for each and every household – nearly 300! And while I am sure each of you would love to hear from me, I think it’s more important for you to hear from one another. Once printed, the addressed postcards will be put in packets of 5-10 and available at the church. Please come pick up a pack or two – with a different last name from yours – and fill them with seasonal joy!
You may find names of people you don’t know, and I encourage you to take this as an opportunity to get to know them! The postcards will come with stamps and will be ready to pick up in November. Please consider picking up some and sharing the season with your beloved community! If you can help, contact Nicole Duff with how many postcards you’re willing to do!
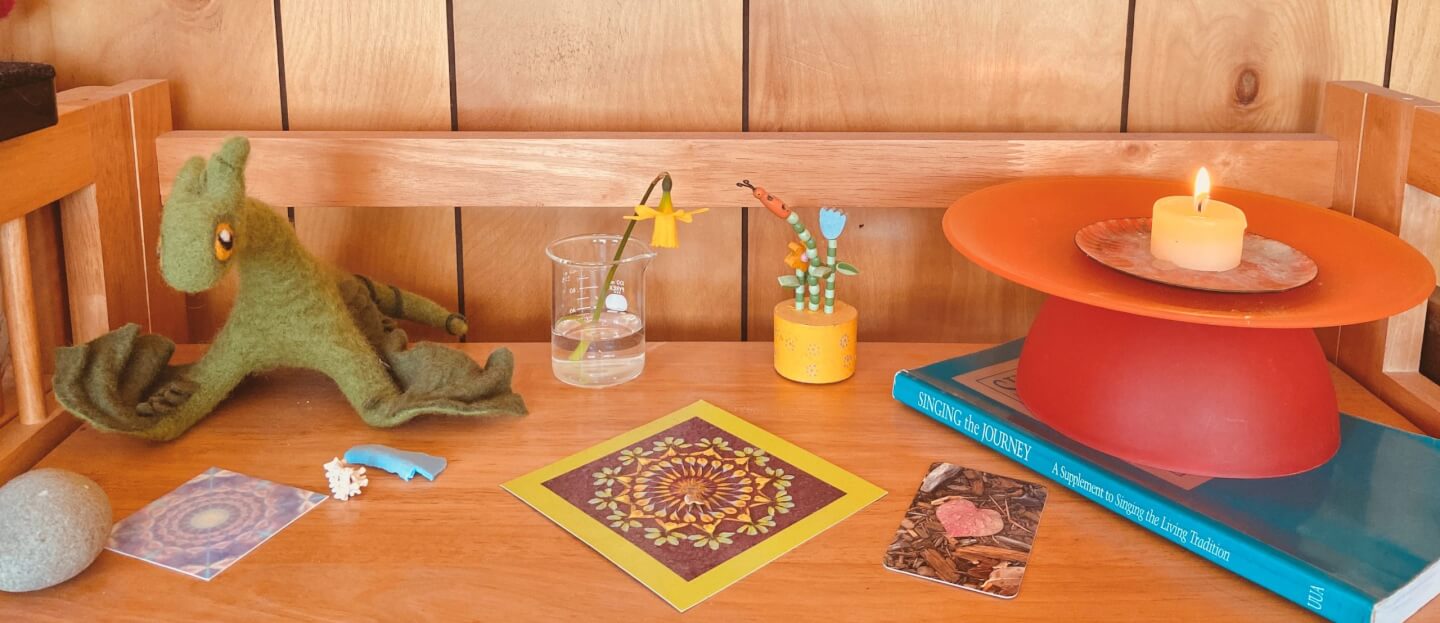
Last week, we started with an at home lesson and activity about making chalices. Now that you’ve got one, where do you put your Flaming Chalice?
Chalices are often placed on an altar among other important memorabilia and artifacts. In our Sanctuary, there’s a very large chalice. In our classrooms, we always have a chalice at the center of the room for story time or check in. Maybe you already have a place in your house that’s your favorite, or that you put some of your most special things. Where is your sacred space, and what do you love about it?
This lesson talk about how to make a special space, or an altar, for your chalices and other special things in your home.
Most religions have special objects or symbols, like the chalice, to help them remember their beliefs and values. These objects also remind us of spiritual practices that we can rely on in our daily lives to help us.
What are some things that you think are really special? Maybe they are things that remind you about people you love, or places you love, or things you love to do. Take some time to walk around your house to gather these up. Maybe you want to have a theme for your alter. You can use a seasonal theme, like spring! For example. What about a color, or texture? Maybe you love purple or blue, or maybe you want everything to be made out of wood, or Legos! A lot of times, altars remind us about nature, the environment, a mood, or a place that we love. Things to consider putting in your special, sacred space:
Water: you can use a little bowl, cup, or jar to store some water in. Maybe it’s water from our water communion in September, maybe it’s from your garden, or your bathroom. Maybe it’s from rain.
Fire: this is our Flaming Chalice. Our flaming chalice with an electric candle or candle and matches, or even a construction paper or Lego flame, will help to remind us of the warmth of a loving heart and the light that we each hold.
Earth: do you love flowers? Or leaves? What about a rock? Maybe there’s a really cool stick that you picked up one day.
Air: do you love feathers? Or maybe it’s just some empty space, or a fan to help remind you about the breath.
Pictures or Paintings: a lot of times, you can include a picture of someone special. Maybe they aren’t here with you anymore. Or maybe it’s a picture of your family when you were having a really good time together. What about of a pet that you love? You can also include a picture or painting that you drew or colored.
Toys & Little Objects: are there any little objects that you can find? These are little things that cheer you up when you look at them. Maybe it’s a favorite stuffed animal. Just any little object you love will do.
A Book: Sometimes it’s really nice to put a book that you like to read or look at on an altar. This can be something that is familiar to you. Maybe there are calming words in it. Maybe there are colorful pictures. You can also put our hymnal on your altar. This way, when you feel like singing, you can easily find a song to sing.
Once you’ve gathered some objects, it’s time to find them a new home all together in a safe spot. You can put them on a bookshelf, a table, near a window, on top of a piano or coffee table. The point is to find a flat and stable surface where they can live. Sometimes it’s nice to put down a cloth on the surface. We call this an altar cloth.
Now that you’ve arranged your new sacred space, give yourself a hug! You’ve done such an amazing job making a new little loving zone for yourself. No matter how small or how big, how many or how few, you have a new special space.
Remember to spend time with your new special space. You can look at it, sit near it, and just stare. Let your eyes and your hands wander around and take in each little thing. You’ll have good memories from different objects. And you’ll have a space to breath in so many of the important things about your life. Where is your sacred space, and what do you love about it?
You can practice our chalice lighting there too: We light this chalice to remind ourselves to treat all people kindly because they are our siblings in spirit; To take good care of the earth because it is our home; And to try to live lives filled with goodness and love because that is how we will become the best people we can be.
Blessing: May your sacred space be a reminder of the love inside of you and the love all around you. So may it be! Amen. Shalom. Salaam.
In UU worship services and religious exploration (RE) classes, we light a chalice, and that’s often accompanied by a responsive reading
“We light this chalice to remind ourselves to treat all people kindly because they are our siblings in spirit; To take good care of the earth because it is our home; And to try to live lives filled with justice and love because that is how we will become the best people we can be.”
Let’s learn some more now about what a chalice is and how to bring the object and practice of chalice lighting into our lives and homes.
History of the Chalice
A flame within a chalice (a cup with a stem and foot) is a primary symbol of the Unitarian Universalist faith tradition. Many of our congregations kindle a flaming chalice in gatherings and worships and feature the chalice symbol prominently. Hans Deutsch, an Austrian artist, first brought together the chalice and the flame as a Unitarian symbol during his work with the Unitarian Service Committee during World War II. To Deutsch, the image had connotations of sacrifice and love. Unitarian Universalists today have many different interpretations of the flaming chalice, including the light of reason, the warmth of community, and the flame of hope. It also is a symbol of our living tradition, changing and growing just as we are changing and growing. What might the Flaming Chalice represent to you?
The Value of a Chalice at Home
Some religions use objects, and many use symbols, to act as a metaphor for their values, faith, and beliefs. Symbols are reminders of our collective identity and history and can serve as a more personal object as well. The flaming chalice is one of our Unitarian Universalist symbolic objects. Can you think of any others? Having a chalice in your home might offer a chance to recall and reflect on your Unitarian Universalist faith. The chalice symbol is an artifact of our faith, an image that helps us to recall the UU tradition we practice together at church. Does having a chalice at home offer an invitation to create more Unitarian Universalist practices and traditions at home – with your family or by yourself?
Making a Found Object Chalice at Home
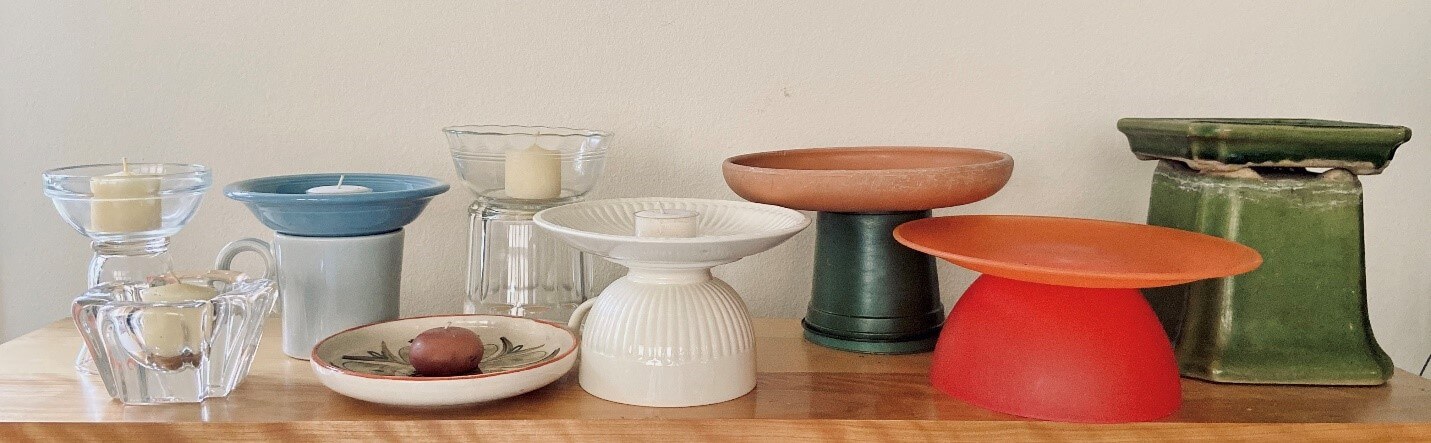
Making a chalice out of every day objects is quite simple and fun! This week, I invite you to gather yourself, with a friend, a sibling, a kid. Give yourself twenty to thirty minutes for this activity. Take a couple of minutes at the beginning of this activity to just imagine things around your house. See what objects pop into mind that might resemble a flame, a cup, a foot, and a chalice. Start walking around your house, like a scavenger hunt. You can collect a lot of things, even if you don’t end up using them all. Look for things that can serve as the flame, and other objects that can serve as the chalice. Flame objects can be things like an LED candle, a beeswax candle, a votive tea light, a flashlight, a headlamp, some red and orange tissue paper, or construction paper cut out like a flame. Get creative! Next, start looking for chalices. Now, a chalice can be one piece, that has a cup to hold the flame and a stem beneath it. Or, it can be two objects-a cups placed atop a stem. At my house, I was able to find many objects to combine into a chalice, but only a couple that were chalices themselves. The kitchen is a great place to start-bowls, cups, teacups, saucers. Also, don’t forget to check outside or in your pile of art supplies-you may find some hidden chalices out there, too!
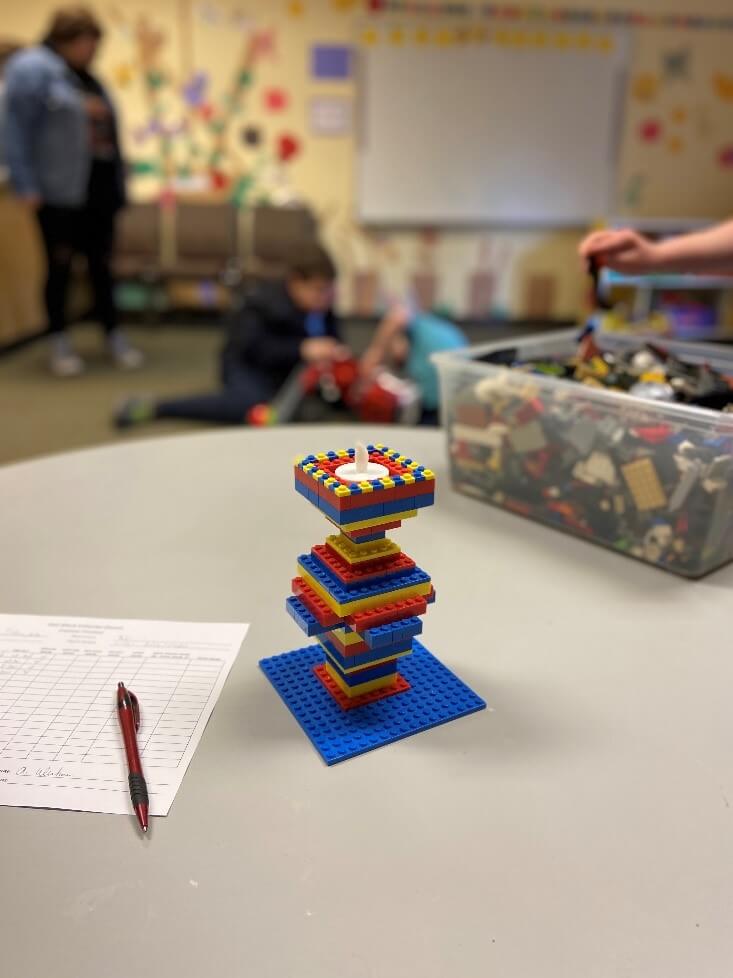
At Home Chalice Challenge
Our East Shore UU kids invite you to join in an at home Chalice Challenge. See how creative you can be with a bowl, a base, and a flame!
Send Photos of Your Found-Object and Lego Chalices!
Making a chalice out of everyday objects is quite simple and fun! This week, I invite you to gather yourself, with a friend, a sibling, a kid. Give yourself twenty to thirty minutes for this activity. Take a couple of minutes at the beginning of this activity to just imagine things around your house. See what objects pop into mind that might resemble a flame, a cup, a foot, and a chalice. Start walking around your house, like a scavenger hunt. You can collect a lot of things, even if you don’t end up using them all.
Look for things that can serve as the flame, and other objects that can serve as the chalice. Flame objects can be things like an LED candle, a beeswax candle, a votive tea light, a flashlight, a headlamp, some red and orange tissue paper, or construction paper cut out like a flame. Get creative! Next, start looking for chalices. Now, a chalice can be one piece, that has a cup to hold the flame and a stem beneath it. Or, it can be two objects-a cups placed atop a stem. At my house, I was able to find many objects to combine into a chalice, but only a couple that were chalices themselves. The kitchen is a great place to start-bowls, cups, teacups, saucers. Also, don’t forget to check outside or in your pile of art supplies-you may find some hidden chalices out there, too!
How BIG can you make your chalice? How little of chalice can you make? What about colorful. Or, what about just one color? Can you make a chalice that lights up on it’s own? What about one that plays a song, or dances? What about a chalice made from soil, or water, or Legos?
Chalices are often placed on an altar among other important memorabilia and artifacts. In our Sanctuary, there’s a very large chalice. In our classrooms, we always have a chalice at the center of the room for story time or check in.
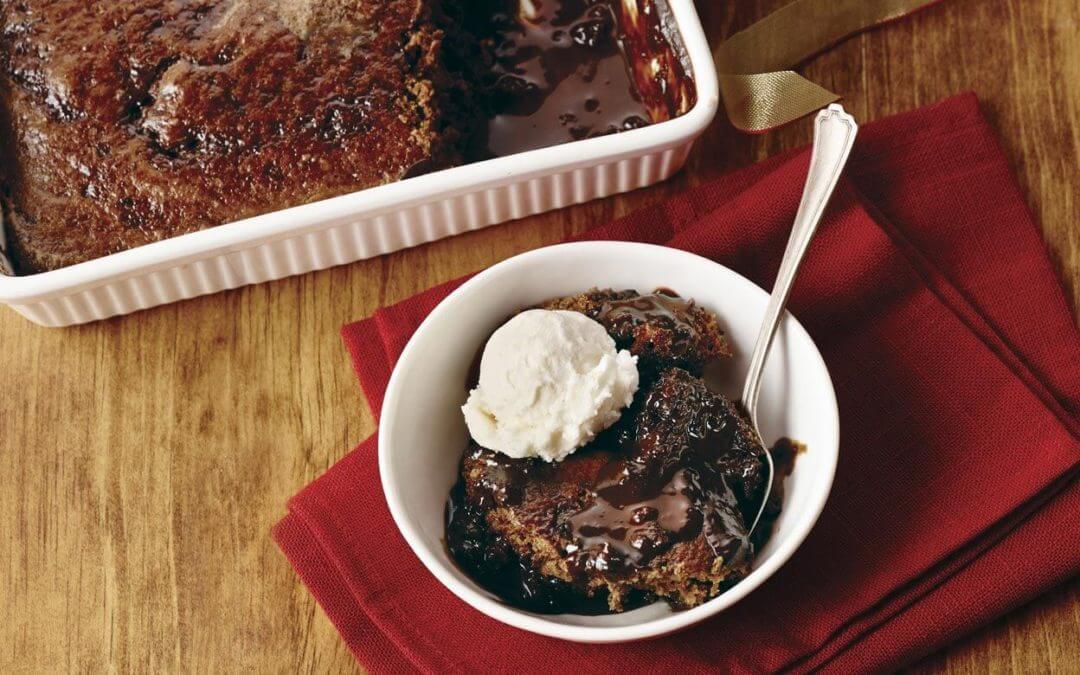
During times of stress and uncertainty, simple comforts can go a long way. Luckily, you don’t always have to hold it all together all the time. This perfectly gooey chocolate treat shows us that sometimes it’s okay to be a little messy. Little is required to concoct this simple treat, so go ahead and brighten your day with a bit of sweetness.
Ingredients
Step One
2/3 cups brown sugar
3 tablespoons cocoa powder
1 1/2 cups hot water
Step Two
1/3 cup unbleached white flour
2 tablespoons cocoa powder
1/4 teaspoon baking powder
1/8 teaspoon salt
1 egg
1/2 cup brown sugar
2 tablespoons melted butter
1 teaspoon vanilla
1/4 cup diced walnuts, if desired
Method
Preheat the oven to 350 degrees F
Step One
Lightly oil a 9×9-inch baking pan. In a small bowl, combine the brown sugar and cocoa and sprinkle the mixture into the bottom of the baking pan. Pour the hot water over this and mix gently with a wooden spoon. The consistency will be lumpy.
Step Two
In a medium-sized mixing bowl, combine the flour, cocoa powder, baking powder, and salt.
In a separate small bowl, beat the egg. Mix in the brown sugar, melted butter, and vanilla. Add the dry ingredients to the wet and mix well with a wooden spoon or a whisk, until there are no lumps in the batter. Add the nuts now, if desired
Step Three
Drop spoonfuls of the batter evenly into the mixture of cocoa powder and brown sugar, which is already covering the bottom of the pan. Bake for 35 minutes. Let the cake sit for 20 minutes to allow the pudding to set before serving. It can be served warm, or refrigerated and served chilled.
How to Dye Easter Eggs with Foods from Your Own Home Kitchen
So it’s Easter season, and you’re at home, and you’re not ready with the traditional store-bought dye kit. Don’t worry! I got you! This year, break the habit of buying those kits, and try out this age-old method of household dye baths. These are all food based dyes, so there’s no chemicals to be found here.
I’ve tried different methods to this and what follows is a tried and true route for achieving the colors and consistency that you’re looking for. Don’t let something new stand in the way of savoring good traditions.
How to Dye Easter Eggs with Things in Your Kitchen
In this three-step process you’ll make all the dyes first, then boil and prepare the eggs, and finally dye the eggs. Equipment
eggs (however many you want to make) – white eggs work much better than brown at picking up the color of your dye baths · Coconut or olive oil (optional – for adding luster to eggs)
Instructions
Making Easter Egg Dye
Go to the list below this recipe and determine what you have on hand that can serve for your dye baths. 2. Clean and prep your dye matter.
Bring the dye matter and water to a boil in individual pots.
Turn heat down to low and simmer, covered, for 15-60 minutes until desired color is reached. The eggs will be several shades lighter so it’s best to go for deep, rich hues.
Remove the egg dye from heat and let it cool to room temperature.
Pour the dye through a mesh strainer into the cups that you’ll be using for dyeing your eggs and add 1 tablespoon of vinegar for each cup of dye liquid.
Boiling the Eggs
Add the eggs to a medium pot and cover them with cold water. Bring the water to a hard boil, then turn off the heat and cover the pot. After 10 minutes, place the eggs in a bowl of cold water and let them sit until they’re cool to the touch.
Drain the bowl and replace with warm, soapy water – I use non-toxic castile soap. Gently rub the eggs with a washcloth or your thumb to remove oils that prohibit the natural dyes from adhering effectively to the egg shell.
**Want to get creative? Try adhering things to your eggs to help create stencils. Rubber bands or strings work great. Want multiple colors on one egg? Try placing them in different angles and levels in bowls to get variations of color and shape on the egg. What about designs? Try using wax crayons to make some drawings before you dye the egg. Really want to go all out? Go forage a leaf or fern and see if you can get that to act as your negative shape stencil.
Coloring The Eggs
Lower the eggs into the dye and place them in the fridge. Soak until your desired color is reached. (We usually soak ours overnight.)
When the eggs are ready scoop them out with a slotted spoon and place them on a drying rack or an upside down egg carton.
Naturally-dyed eggs have a matte finish. If you’d like to add a little luster, rub with a drop or two of coconut or olive oil. Can the dyes be stored overnight and used the next day?
Yep!
Can I draw on the eggs with a wax crayon before dyeing them?
We haven’t tried this but I don’t see a reason not to as long as the crayons are non-toxic.
Do dyes change the flavor of the eggs?
Nope!
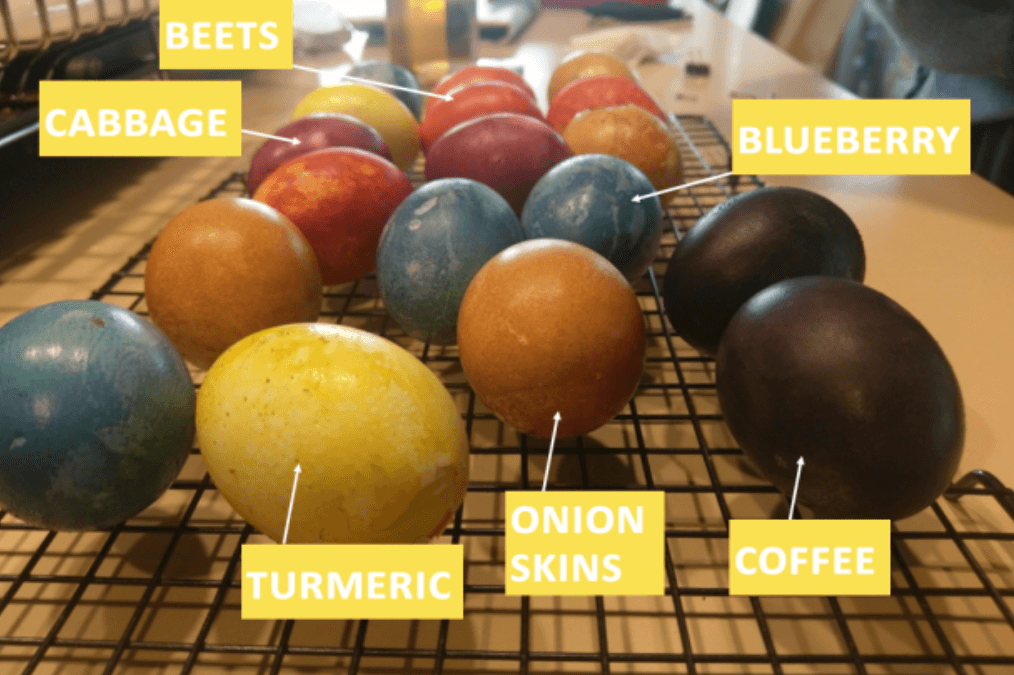
Dye sources, and the colors they produce
Following are the dye sources I’ve found to yield the richest colors. Remember to use
only edible plants or portions of plants (no rhubarb leaves, for example).
Onion skins marbleized oranges and yellows
Onion skins with unsprayed rose petals
peachy hues with green or yellow tints
Shredded red cabbage midnight blue and teal • Beet root brown with a purple cast • Beet tops dove gray
Spinach pale green
Carrots yellow with olive overtones • Carrot tops soft gold
Blue potatoes muted teal
Grape juice deep lavender (for a lovely crystallized sugar coating, let the egg dry without rinsing)
Blueberries (frozen is fine) deep blue
Raspberries (frozen is fine) light fuchsia
Blackberries (frozen is fine) plum
Coffee milk-chocolate brown
Black tea reddish tan
Cinnamon subdued mahogany
Paprika light orange
Turmeric vivid gold
To Dye Easter Eggs Pink, You’ll Need:
2 cups water
2 cups peeled, grated beets
1-2 tablespoons white vinegar
To Dye Easter Eggs Orange, You’ll Need:
2 cups yellow onion skins
Enough water to cover skins by 1 inch
1-2 tablespoons white vinegar
To Dye Easter Eggs Yellow, You’ll Need:
2 cups water
1 tablespoon turmeric
2 tablespoons vinegar creates
Other options: Strongly brewed chamomile tea creates a soft yellow. To Dye Easter Eggs Green or Blue, You’ll Need:
2 cups shredded purple cabbage
Enough water to cover cabbage by 1 inch
1-2 tablespoons vinegar
Brown eggs will turn green and white eggs will turn blue.
Other options: Strongly brewed hibiscus tea (with one tablespoon vinegar per cup) will create the dark green pictured in the photo at the top. Blueberries will create a slightly marbled blue color.
Virtual Easter Egg Hunt
The Real Story of the Easter Bunny
Adapted from The Ostara Bunny by Rev. Christina Leone
Once upon a time, a long, long time ago… There was a Goddess. Her name was Ostara, or Eostre. Do you have any ideas what she might have been the Goddess of? What about words that are kind of similar to her name? (Easter)
She was the Goddess of springtime. What happens in springtime? (Flowers bloom, it gets warmer, new things are born, the world ‘wakes up’ from winter.)
This Goddess gave birth to the sun, and helped it shine brighter every day in the sky. She was the bringer of warmth, and color. Her festival day is the Spring Equinox (which happened this past Thursday,) and celebrates new life and springtime.
And one day, while she was going about her very important business, a little girl came to her. The little girl had found a small bird on the ground. The ground was still very cold, because spring was not quite there… Ostara hadn’t finished her work yet. The little bird was injured, and very cold… The little bird was dying.
“Please!” the little girl pleaded with the goddess Ostara. “Please save this little bird.” The goddess was annoyed. “Can’t you see that I’m busy here?” But the girl was persistent. “Please, it won’t take much. Just help bring the bird back to life!”
The Goddess was so moved by the little girl’s pleas that she agreed to help the bird However, the bird was too weak and broken to be fully fixed. The Goddess knew that something would have to change for the bird to survive. She carefully considered what to do and decided to turn the bird into a different animal instead.
What kind of animal do you think she decided on?
What kind of animal would you choose?
Well, in this story, she decided to turn the bird into a rabbit. She was stronger than ever, and could hop a long way, and had a big fluffy coat that could keep her warm, instead of light little feathers like before. So, happily, the bird-bunny hopped away.
But because the bunny used to be a bird, there was something a little different about her. She had big, floppy ears like a bunny and hopped like a bunny, but she still laid eggs like a bird. And every springtime, the bunny remembers how the Goddess helped her. So, to say thank you, she lays colorful, beautiful eggs to honor the colors of springtime that Ostara brings. It brings those eggs to the children to honor the child who saved her life.